Pads, Brake: Removal: SRT8
NOTE:
Removal process is the same for both sides of the vehicle.
NOTE:
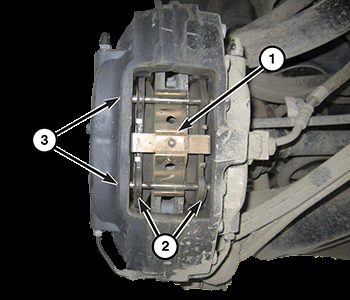
Six piston caliper shown in illustration, four piston caliper similar.
- Raise and support the vehicle. Refer to HOISTING, STANDARD PROCEDURE .
- Remove the tire and wheel assembly. Refer to REMOVAL
.
- Using hammer and pin punch on the outboard end, remove the lower brake pad support pin (4) out of the caliper.
- Remove brake pad spring clip (1) out from under the upper support pin (4) still in caliper.
- Using hammer and pin punch on the outboard end, remove the upper brake pad support pin (4) out of the caliper.
- If equipped, remove the brake caliper center support bolt (2).CAUTION:
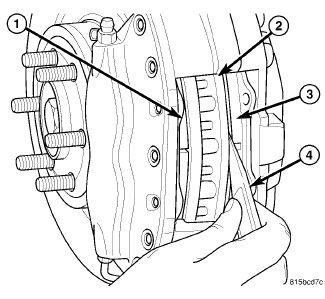
When pushing pistons back into caliper bores, if hand pressure is not sufficient, use only a trim stick as shown in illustration or other suitable soft tool to do so. Never use a screwdriver or other metal pry bar due to potential damage to braking surface of rotor or pads.
- Using hand pressure, pull pads back to seat caliper pistons into bores if possible. If not possible, perform the following to do this correctly without damaging the caliper, pistons, dust boots or brake rotor disc.
- Place trim stick (3) between inboard brake pad and outer edge of rotor (1).
- Using trim stick (3), apply pressure against the inboard brake pad until both pistons are completely bottomed in bores of inboard caliper half. Leave trim stick in place to hold pistons in place.
- Place second trim stick between outboard brake pad and rotor, then repeat above step on outboard pad and pistons.
- Remove the brake pads (3) through opening in caliper.
- Once brake pads are removed from caliper, inspect all four caliper pistons and dust boots for evidence of brake fluid leakage. Also inspect dust boots on all caliper pistons for any cuts, tears or heat cracks and brake pad supports (if equipped) for excess wear or damage. If caliper fails inspection, it should be replaced.
NOTE:
Removal process is the same for both sides of the vehicle.
- Raise and support the vehicle. Refer to HOISTING, STANDARD PROCEDURE .
- Remove the tire and wheel assembly. Refer to REMOVAL
.
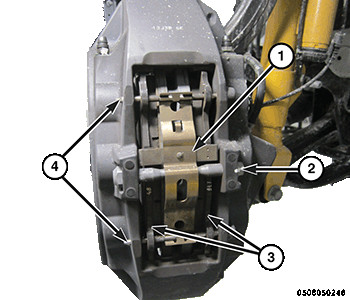
- Using hammer and pin punch on the outboard end, remove the lower brake pad support pin (3) out of the caliper.
- Remove brake pad spring clip (1) out from under the upper support pin (3) still in caliper.
- Using hammer and pin punch on the outboard end, remove the upper brake pad support pin (3) out of the caliper.CAUTION:
When pushing pistons back into caliper bores, if hand pressure is not sufficient, use only a trim stick as shown in illustration or other suitable soft tool to do so. Never use a screwdriver or other metal pry bar due to potential damage to braking surface of rotor or pads.
- Using hand pressure, pull pads back to seat caliper pistons into bores if possible. If not possible, perform the following to do this correctly without damaging the caliper, pistons, dust boots or brake rotor disc.
- Place trim stick (3) between inboard brake pad and outer edge of rotor (1).
- Using trim stick (3), apply pressure against the inboard brake pad until both pistons are completely bottomed in bores of inboard caliper half. Leave trim stick in place to hold pistons in place.
- Place second trim stick between outboard brake pad and rotor, then repeat above step on outboard pad and pistons.
- Remove the brake pads (2) through opening in caliper.
- Once brake pads are removed from caliper, inspect all four caliper pistons and dust boots for evidence of brake fluid leakage. Also inspect dust boots on all caliper pistons for any cuts, tears or heat cracks and brake pad supports (if equipped) for excess wear or damage. If caliper fails inspection, it should be replaced.