A/C Clutch
Typical A/C compressor and clutch assembly shown in illustrations.
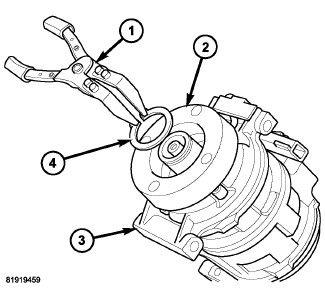
- Align the dowel pin on the back of the A/C clutch coil (2) with the hole in the front of the A/C compressor (3) and position the coil onto the compressor. Be certain that the A/C clutch coil wire lead is properly routed so that it is not pinched between the compressor housing and the coil.CAUTION:
The snap ring must be fully and properly seated in the groove or it will vibrate out, resulting in a clutch failure and severe damage to the A/C compressor.
NOTE:A new snap ring must be used to secure the A/C clutch coil to the A/C compressor. The bevel side of the snap ring must face outward and both snap ring eyelets must be oriented to the right or to the left of the coil dowel pin location on the A/C compressor.
- Using A/C Snap Ring Pliers (special tool #9764, Pliers, A/C Snap Ring) (1) or equivalent, install the snap ring (4) that secures the A/C clutch coil to the front of the A/C compressor. Be certain that the snap ring is fully and properly seated in the groove and oriented correctly.CAUTION:
Be certain to position the A/C clutch coil wire lead so that it is not damaged during A/C compressor pulley and bearing installation.
CAUTION:When installing the pulley and bearing assembly, DO NOT mar the friction surfaces of the pulley or premature failure of the clutch will result.
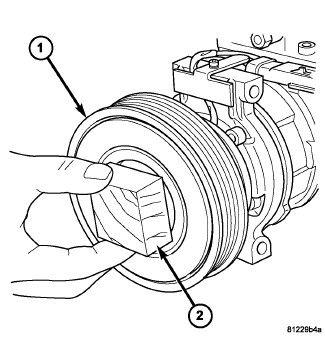
- Install the pulley and bearing assembly (1) onto the front of the A/C compressor. If necessary, tap the pulley gently with a block of wood (2) placed on the pulley friction surface.CAUTION:
The snap ring must be fully and properly seated in the groove or it will vibrate out, resulting in a clutch failure and severe damage to the A/C compressor.
NOTE:A new snap ring must be used to secure the pulley and bearing assembly to the A/C compressor. The bevel side of the snap ring must face outward.
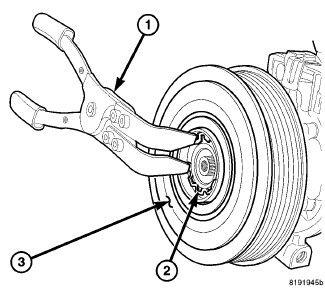
- Using A/C Snap Ring Pliers (special tool #9764, Pliers, A/C Snap Ring) (1) or equivalent, install the snap ring (2) that secures the pulley and bearing assembly (3) to the front of the A/C compressor. Be certain that the snap ring is fully and properly seated in the groove.
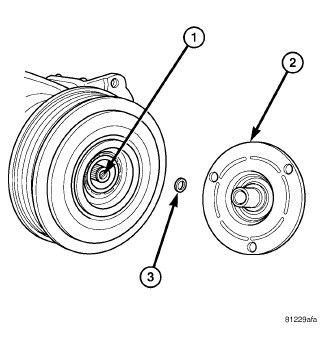
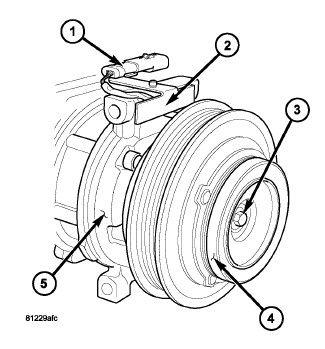
- If the original clutch plate (2) and pulley and bearing assembly are to be reused, reinstall the original shim(s) (3) onto the compressor shaft (1). If a new clutch plate and pulley and bearing assembly are being used, install a trial stack of shims 2.54 mm (0.010 in.) thick onto the compressor shaft.
- Install the clutch plate (4) onto the front of the A/C compressor (5).
- Install the compressor shaft bolt (3) and tighten to the proper torque specifications. Refer to TORQUE SPECIFICATIONS .NOTE:
The shims may compress after tightening the shaft bolt. Check the air gap in four or more places to verify the air gap is correct. Spin the pulley before performing a final check of the air gap.
NOTE:On vehicles with the clutch plate recessed into the pulley, use a 90° wire gap gauge to measure the clutch air gap. On other vehicles, use a blade type feeler gauge to measure the air gap.
- With the clutch plate assembled tight against the shim(s), measure the air gap between the clutch plate and the pulley and bearing assembly. The air gap should be between 0.35 - 0.60 mm (0.014 - 0.024 in.). If the air gap is not between specifications, add or subtract shims as needed until the correct air gap is obtained.CAUTION:
Be certain that the A/C clutch coil wire lead is routed so that it is not pinched between the compressor housing and the coil connector bracket.
- Carefully route the A/C clutch coil wire lead behind the connector bracket (2).
- Install the A/C clutch coil connector (1) onto the connector bracket.
- Connect the engine wire harness to the A/C clutch coil connector.
- Install the accessory drive belt. Refer to BELT, SERPENTINE, INSTALLATION .
- Install the radiator fan and shroud assembly. Refer to FAN, COOLING, INSTALLATION .
- On 5.7L and 6.4L engine equipped models, install the air cleaner housing and air intake hose. Refer to BODY, AIR CLEANER, INSTALLATION .
- Connect the negative battery cable. If equipped with an Intelligent Battery Sensor (IBS), connect the IBS connector.
- Verify proper A/C clutch operation.