Cylinder Head: Installation: Right
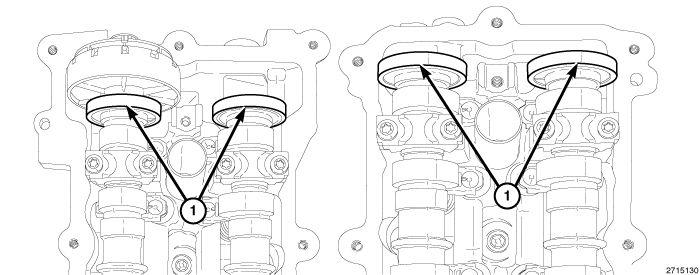
The magnetic timing wheels (1) must not come in contact with magnets (pickup tools, trays, etc.) or any other strong magnetic field. This will destroy the timing wheels ability to correctly relay camshaft position to the camshaft position sensor.
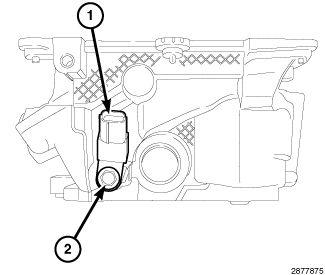
- If removed, install the ignition coil capacitor (1). Tighten bolt (2) to the proper specification. Refer to TORQUE SPECIFICATIONS
.CAUTION:
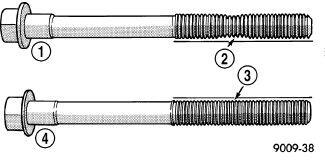
The cylinder head bolts are tightened using a torque plus angle procedure. The bolts must be examined BEFORE reuse. If the threads are necked down the bolts must be replaced.
NOTE:Typical cylinder head bolt shown.
- Check the cylinder head bolts for necking by holding a scale or straight edge against the threads. If all the threads do not contact the scale (2) the bolt must be replaced.CAUTION:
When cleaning cylinder head and cylinder block surfaces, DO NOT use a metal scraper because the surfaces could be cut or ground. Use ONLY a wooden or plastic scraper.
- Clean and prepare the gasket sealing surfaces of the cylinder head and block. Refer to ENGINE GASKET SURFACE PREPARATION
.CAUTION:
Non-compressible debris such as oil, coolant or RTV sealants that are not removed from bolt holes can cause the aluminum casting to crack when tightening the bolts.
- Clean out the cylinder head bolt holes in the engine block.WARNING:
The multi-layered steel head gaskets have very sharp edges that could cause personal injury if not handled carefully.
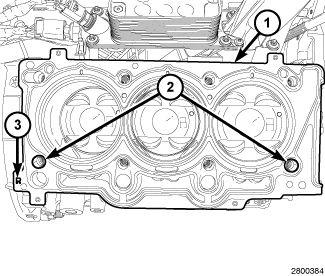
CAUTION:The installation of the cylinder head gaskets are not interchangeable between the left and right cylinder heads. They are clearly marked (3) with "R" for right and "L" for left. They must be applied on a dry surface, without the use of any adhesives.
- Position the new cylinder head gasket (1) on the locating dowels (2).
- Position the cylinder head onto the cylinder block. Make sure the cylinder head seats fully over the locating dowels.NOTE:
Do not apply any additional oil to the bolt threads.
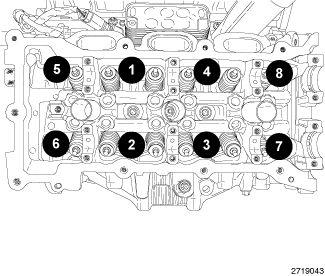
- Install the eight cylinder head bolts finger tight.
- Tighten the cylinder head bolts in the sequence shown, following this 9 step torque plus angle method. The torque sequence must be used for each step. Tighten according to the following torque values:
- Step 1: All to 30 N.m (22 ft. lbs.)
- Step 2: All to 45 N.m (33 ft. lbs.)
- Step 3: Re-tighten all to 45 N.m (33 ft. lbs.)
- Step 4: All + 125° Turn (optional angle if 125° rotation cannot be accomplished in one motion; tighten all by turning 35° followed by tightening all by turning 90°) Do not use a torque wrench for this step.
- Step 5: Loosen all fasteners in reverse of sequence shown
- Step 6: All to 30 N.m (22 ft. lbs.)
- Step 7: All to 45 N.m (33 ft. lbs.)
- Step 8: Re-tighten all to 45 N.m (33 ft. lbs.)
- Step 9: All + 130° Turn (optional angle if 130° rotation cannot be accomplished in one motion; tighten all by turning 40° followed by tightening all by turning 90°) Do not use a torque wrench for this step.
NOTE:For engine builds using a new block follow steps 1-9. For engine re-builds (reuse block) follow step 6-9.
NOTE:If the hydraulic lifters are being reused, reassemble them into their original locations.
- If removed, install the hydraulic lifters.NOTE:
If the rocker arms are being reused, reassemble them into their original locations.
- Install the rocker arms. Refer to ROCKER ARM, VALVE, INSTALLATION
.CAUTION:
Do not rotate the camshafts more than a few degrees independently of the crankshaft. Valve to piston contact could occur resulting in possible valve damage. If the camshafts need to be rotated more than a few degrees, first move the pistons away from the cylinder heads by rotating the crankshaft counterclockwise to a position 30° before-top-dead-center. Once the camshafts are returned to their top-dead-center position, rotate the crankshaft clockwise to return the crankshaft to top-dead-center.
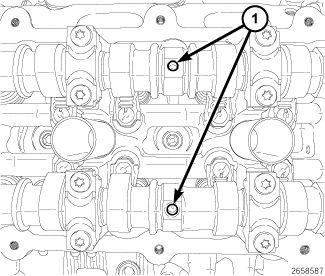
- Verify that the camshafts are set at TDC by positioning the alignment holes (1) vertically.
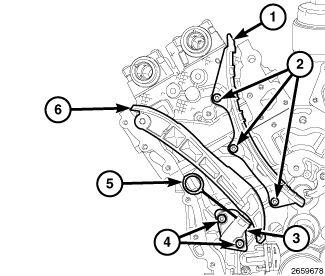
- Install the right cam chain guide (1) with three bolts (2). Tighten bolts (2) to the proper specification. Refer to TORQUE SPECIFICATIONS .
- Install the right cam chain tensioner (3) to the engine block with two bolts (4). Tighten (4) to the proper specification. Refer to TORQUE SPECIFICATIONS .
- Reset the right cam chain tensioner (3) by pushing back the tensioner piston and installing Tensioner Pin (special tool #8514, Pins, Tensioner) (5).
- Install the right tensioner arm (6).CAUTION:
Always reinstall timing chains so that they maintain the same direction of rotation. Inverting a previously run chain on a previously run sprocket will result in excessive wear to both the chain and sprocket.
- Press the right exhaust cam phaser onto the exhaust camshaft. Install and hand tighten the oil control valve.
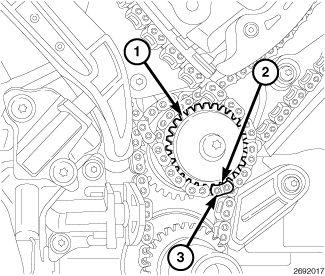
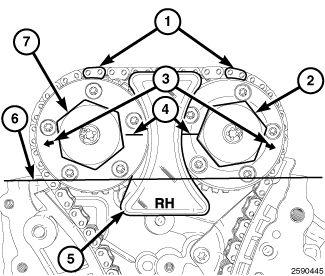
- Drape the right side cam chain over the right exhaust cam phaser and onto the idler sprocket (1) so that the dimple (2) is aligned with the plated link (3) on the cam chain.
- While maintaining this alignment, route the cam chain around the exhaust and intake cam phasers so that the plated links are aligned with the phaser timing marks (1). Position the right side cam phasers so that the arrows (3) point away from each other and the scribe lines (4) are parallel to the valve cover sealing surface (6). Press the intake cam phaser onto the intake cam, install and hand tighten the oil control valve (2).NOTE:
Minor rotation of a camshaft (a few degrees) may be required to install the camshaft phaser or phaser lock.
- Install the RH Camshaft Phaser Lock (special tool #10202, Locks, Camshaft/Phaser) (5) and tighten the oil control valves (2) and (7) to the proper
Refer to TORQUE SPECIFICATIONS .
- Remove the RH Camshaft Phaser Lock (special tool #10202, Locks, Camshaft/Phaser).
- Remove the Tensioner Pin (special tool #8514, Pins, Tensioner) (6) from the RH cam chain tensioner.
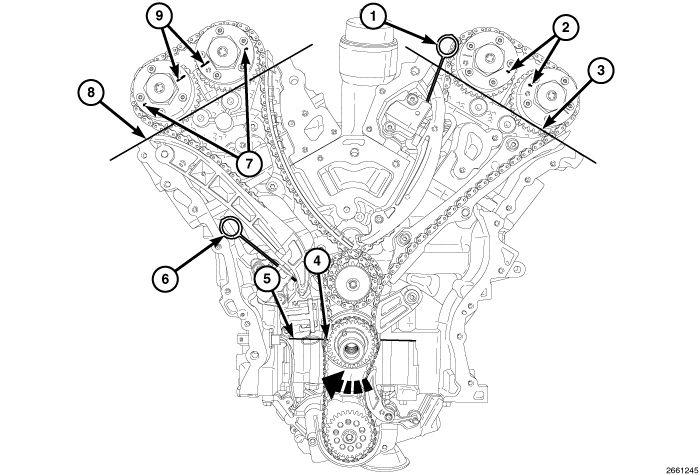
- Rotate the crankshaft clockwise two complete revolutions stopping when the dimple (4) on the crankshaft is aligned the with the block/bearing cap junction (5).
- While maintaining this alignment, verify that the arrows on the left side cam phasers (2) point toward each other and are parallel to the valve cover sealing surface (3) and that the right side cam phaser arrows (7) point away from each other and the scribe lines (9) are parallel to the valve cover sealing surface (8).
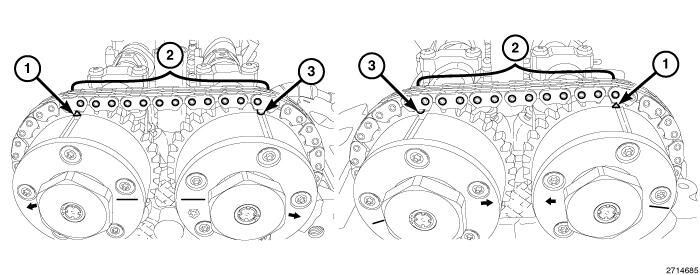
- There should be 12 chain pins (2) between the exhaust cam phaser triangle marking (1) and the intake cam phaser circle marking (3).
- If the engine timing is not correct, repeat this procedure.
- Install the engine timing cover, crankshaft vibration damper, upper and lower oil pans and cylinder head covers. Refer to COVER(S), ENGINE TIMING, INSTALLATION .
- Install the spark plugs. Refer to SPARK PLUG, INSTALLATION
.
- Position the upper intake manifold support bracket (2) and install the retaining stud (3) finger tight.
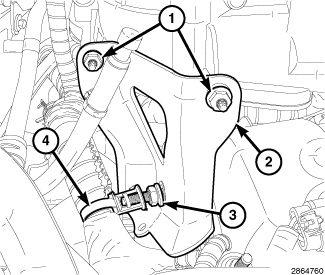
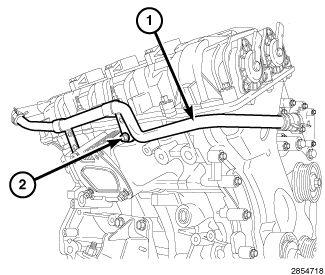
- Install the heater core supply tube (1) with one bolt (2) tightened to the proper specification. Refer to TORQUE SPECIFICATIONS
.
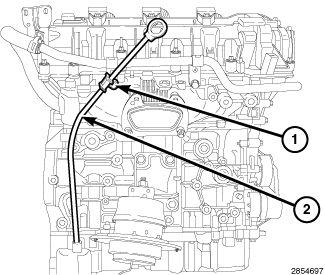
- Install the oil level indicator (2). Tighten the bolt (1) to the proper specification. Refer to TORQUE SPECIFICATIONS
.
- Install the generator (1). Refer to GENERATOR, INSTALLATION .
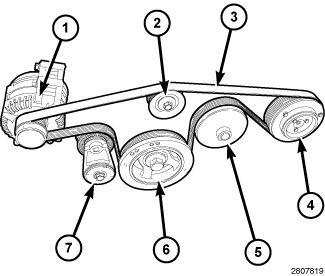
- Rotate the accessory drive belt tensioner (7) counterclockwise until it contacts the stop and install the accessory drive belt (3), then slowly rotate the tensioner into position.
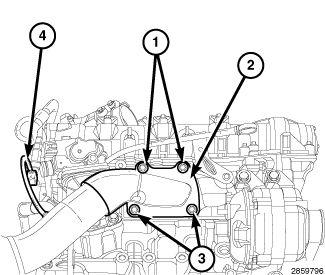
- Install the right down pipe (2) and tighten lower flange bolts (3) finger tight.
- Install the upper down pipe flange bolts (1) and tighten bolts (1, 3) to the proper specification. Refer to TORQUE SPECIFICATIONS .
- Connect the right upstream oxygen sensor wire harness connectors (4).
- Install the upper and lower intake manifolds. Refer to MANIFOLD, INTAKE, INSTALLATION
.
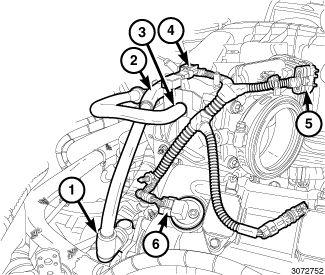
- Connect the Camshaft Position Sensor (CMP) wire harness connector (6).
- Connect the throttle body wire harness connector (5).
- Connect the Manifold Absolute Pressure (MAP) Sensor wire harness connector (4).
- Connect the brake booster vacuum hose (3).
- Install the PCV hose onto the intake manifold (2) and the PCV valve (1).
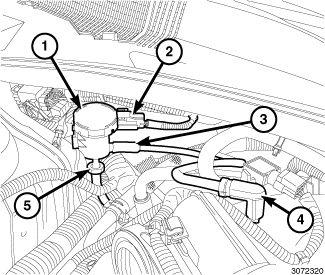
- Connect the EVAP purge solenoid vacuum line (4) to the intake manifold.
- Connect the vacuum line (3) to the EVAP purge solenoid (1).
- Raise and support the vehicle. Refer to HOISTING, STANDARD PROCEDURE .
- If removed, install the oil filter.
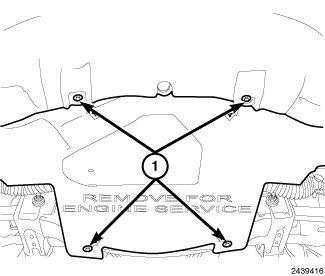
- Install the belly pan and securely tighten bolts (1).
- Remove support and lower the vehicle.
- Install the air cleaner body. Refer to BODY, AIR CLEANER, INSTALLATION .
- Fill the crankcase with the specified type and amount of engine oil. Refer to CAPACITIES AND RECOMMENDED FLUIDS, SPECIFICATIONS .
- Fill the cooling system with the specified type and amount of engine coolant. Refer to STANDARD PROCEDURE .
- Connect the negative battery cable.
- Run the engine until it reaches normal operating temperature and check for leaks.
The Cam/Crank Variation Relearn procedure must be performed using the scan tool anytime there has been a repair/replacement made to a powertrain system, for example: flywheel, valvetrain, camshaft and/or crankshaft sensors or components.